Considering just how much Godot can do with the microphone, and audio in general, the docs can be pretty sparse. So I’ve gone through the sample projects, Twitter posts, GitHub repos, devblogs, and what tangential documentation there is to organize and condense all the information spread over the web into this one post. Let’s dive in!
Project setup
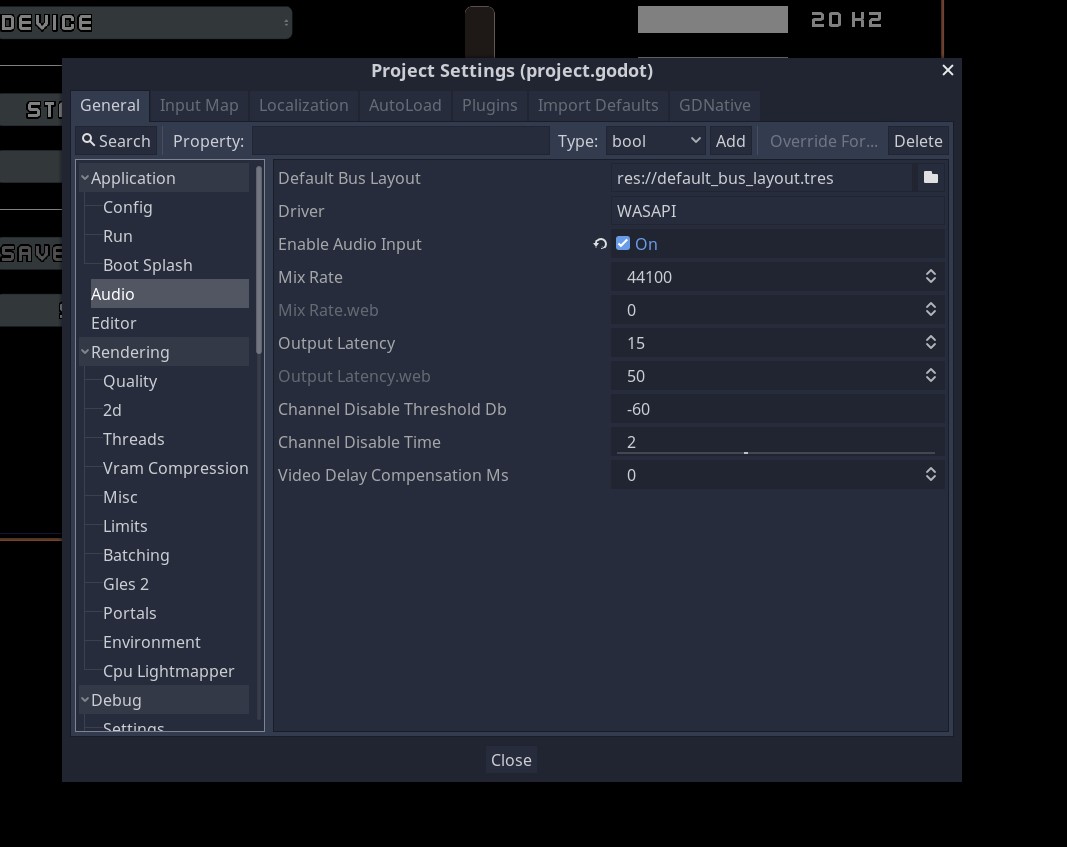
The very first thing you should do, so you don’t end up like me, spinning your wheels double-checking everything and banging your head on your desk when nothing works, is to enable audio input on your project. To do this, go to Project Settings > Audio > And check “Enable audio input.”
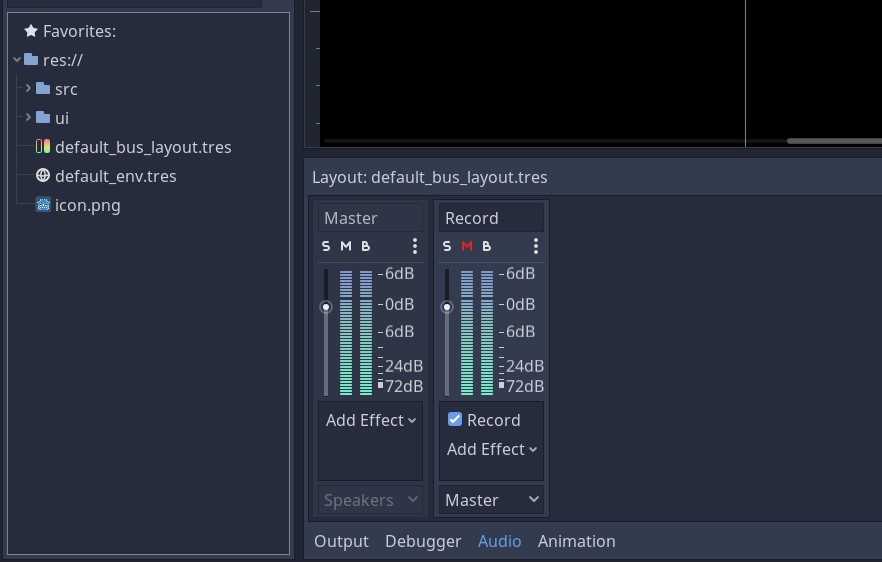
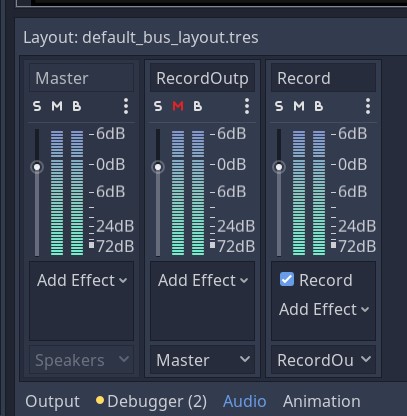
Once that’s done, add an Audio Bus to your project, name it something reasonable since you’ll have to look it up by name later, and add the Record effect to it. You’ll also probably want to go ahead and mute this bus, otherwise the raw mic input will be audible the entire time the game is running.
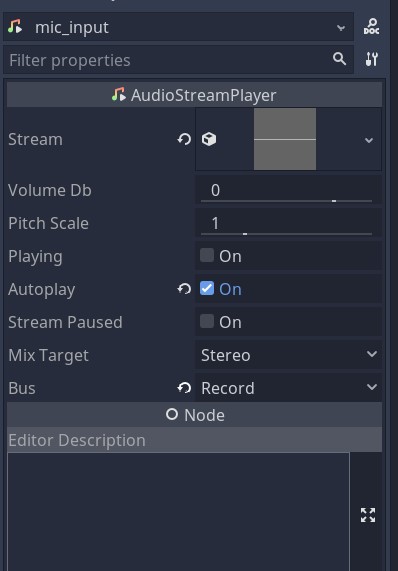
But that just prepares the bus for recording, to actually pipe audio into your project, you next need to add an AudioStreamPlayer with a stream type of a new AudioStreamMicrophone, an output bus set to your recording bus, and “Autoplay” checked so that it will be active from the start. Alternatively, you can toggle the playing property manually to control when you accept audio input, but there’s a better way to control when and what you record that I’m about to show you, so it’s not really necessary.
Recording audio, playing it back, and saving it
So now that we have everything wired up and ready to go, let’s look at how we can record some audio and then play it back. First, create your UI how you want it and connect any UI signals to a script so that the user can choose when to start and stop recording and when to play it back.
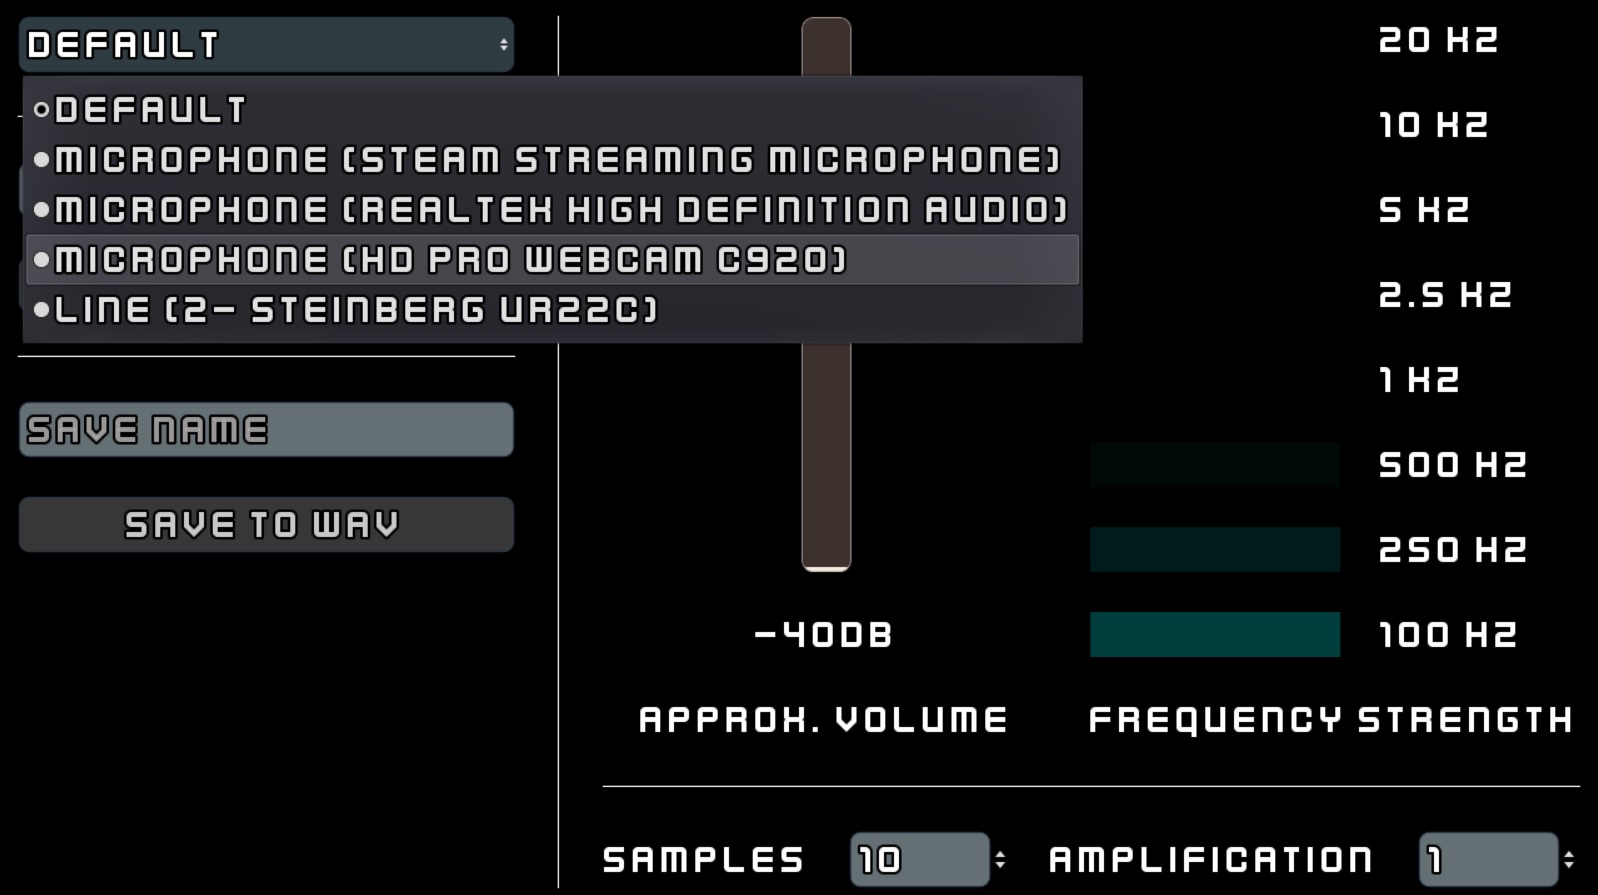
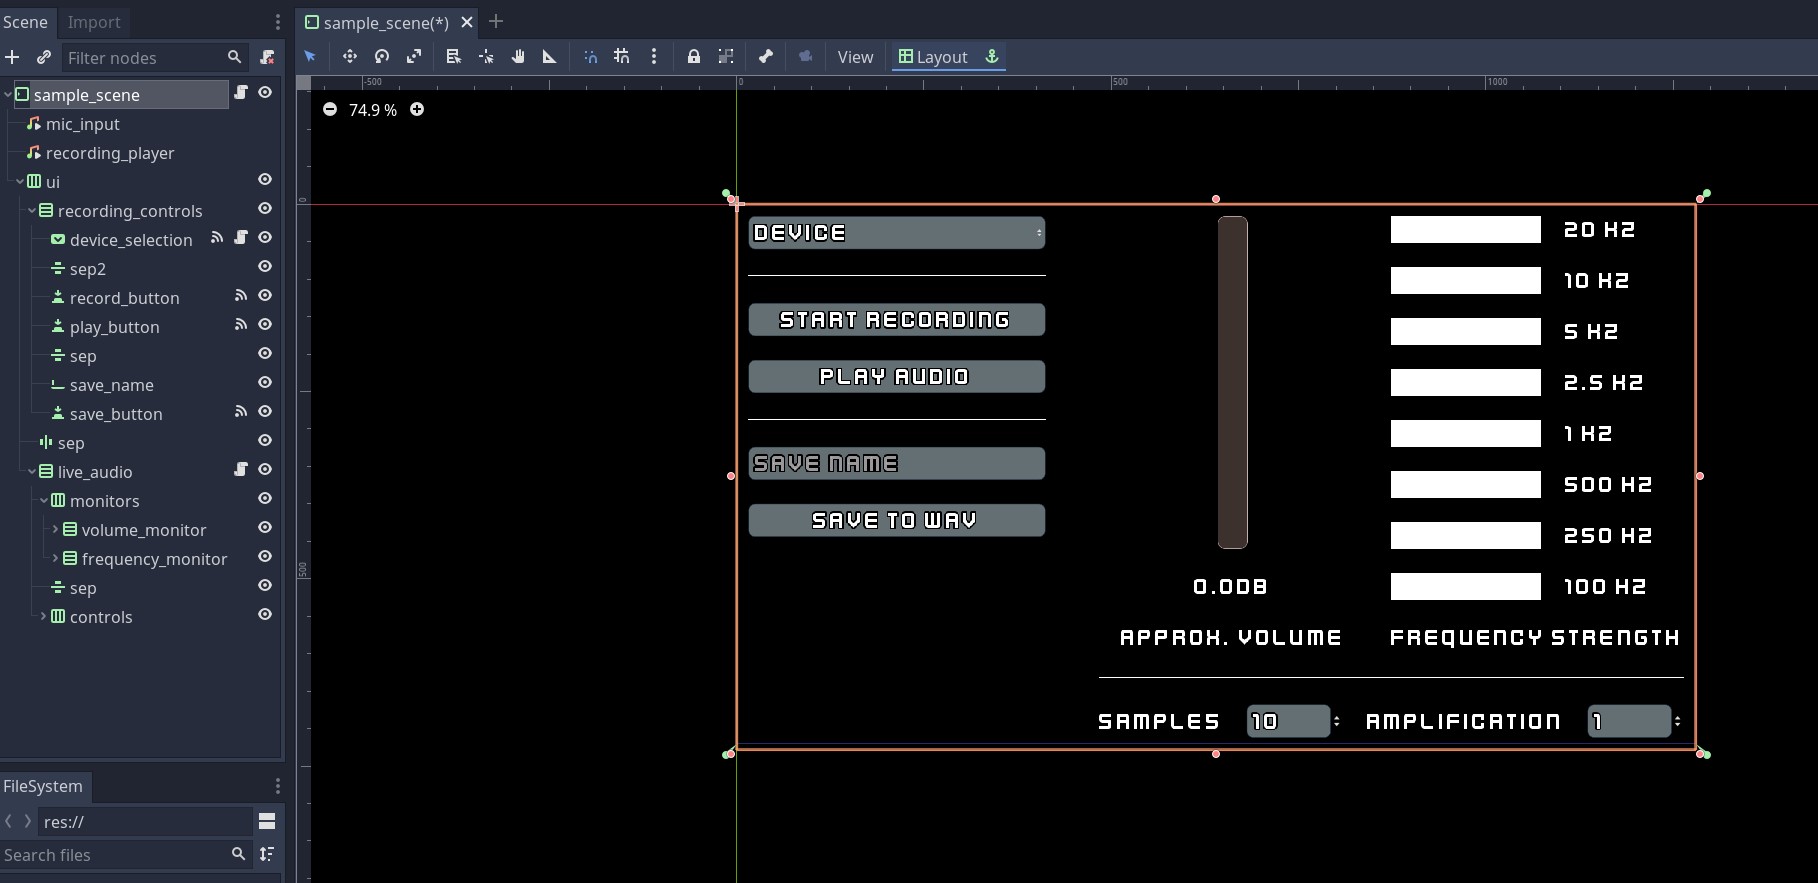 The sample project layout, with UI input signals already wired up to the appropriate scripts.
You’ll then need a reference to the Record effect you added to your bus earlier, and since everything with buses works based off of indices, you’ll first want to get the index of the bus you’re using to record. The code below demonstrates how you can do this:
var record_bus_index: int
var record_effect: AudioEffectRecord

func _ready() -> void:
	record_bus_index = AudioServer.get_bus_index('Record')
	# Only one effect on the bus, so can just assume index 0 for record effect
	record_effect = AudioServer.get_bus_effect(record_bus_index, 0)
Once you have a reference to your recording effect, you can call record_effect.set_recording_active() with the one parameter it takes set to true or false to start or stop recording (full code sample will be below if you want to see this in action).
So now you have your recording in memory, but you still need to get the actual recording data so you can work with it. This can be done with a call to record_effect.get_recording(), which will return an AudioStreamSample containing your recorded audio. To play this audio, you can assign it to the “stream” property on any AudioStreamPlayer instance and then call the play() function on that stream. Just make sure not to use the same AudioStreamPlayer you’re recording from. In the sample project, for instance, you’ll see that there are two players, one for recording and one for playing back audio.
Saving your audio to disk is also straightforward, as you just need to take the AudioStreamSample that get_recording() returned earlier and call the save_to_wav() function with a string parameter defining the path where you want to save the file. You can both give it a hard path if the export needs to be user facing , such as /tmp/my_audio.wav, or a relative path using the user:// prefix if you want to save it along with other files intended for internal use in your game.
And for reference, here’s the full code for playing, recording, and saving audio from the sample project:
extends MarginContainer

onready var record_button = $ui/recording_controls/record_button
onready var recording_player = $recording_player
onready var save_edit = $ui/recording_controls/save_name
onready var play_button = $ui/recording_controls/play_button
onready var save_button = $ui/recording_controls/save_button

var record_bus_index: int
var record_effect: AudioEffectRecord
var recording: AudioStreamSample

func _ready() -> void:
	record_bus_index = AudioServer.get_bus_index('RecordOutput')
	# Only one effect on the bus, so can just assume index 0 for record effect
	record_effect = AudioServer.get_bus_effect(record_bus_index, 0)
	update_button_states()

func _on_record_button_pressed() -> void:
	if record_effect.is_recording_active():
		stop_recording()
	else:
		start_recording()
	update_button_states()

func _on_play_button_pressed() -> void:
	if !recording:
		return
	recording_player.stream = recording
	recording_player.play()

func _on_save_button_pressed() -> void:
	if !recording:
		return

	var save_name = 'my_recording'
	if save_edit.text:
		save_name = save_edit.text
	recording.save_to_wav('%s' % save_name)

func start_recording() -> void:
	record_effect.set_recording_active(true)
	record_button.text = 'Stop recording'

func stop_recording() -> void:
	record_effect.set_recording_active(false)
	record_button.text = 'Start recording'
	recording = record_effect.get_recording()

func update_button_states() -> void:
	play_button.disabled = !recording
	save_button.disabled = !recording
Monitoring audio in realtime
So that’s a quick look at working with data offline, but what if we want to monitor and respond to the audio coming in through the microphone in realtime? It’s actually more straightforward than you probably think. I linked to it at the beginning of this article, but since it’s the primary source for this section I’m going to specifically call out this GitHub repo from Miziziziz for clarifying a lot of this.
Essentially, what we want to do here is use AudioServer.get_bus_peak_volume_left_db to get the output volume of our recording bus, but to do that the bus can’t be muted, which it has been so far. The solution is to create another bus called “RecordOutput”, mute it, pipe your “Record” bus into this new bus, and unmute the “Record” bus so that we can properly monitor its output now.
With this setup, we can now call AudioServer.get_bus_peak_volume_left_db and get the instantaneous peak volume output from our mic input. This will output in decibels, which probably isn’t too useful for you so you can call db2linear to convert it to a float in the range [0, 1]. You should now be able to run your project and see the output of the mic input, but the signal may be a bit low. If that’s the case, you can multiply the output of get_bus_peak_volume_left_db by an amplification value, just be sure to call clamp to keep it in the expected range of [0, 1]. You can also take several samples over time and average them together to get an idea of the overall volume rather than the instantaneous one.
const MAX_SAMPLES: int = 10
var record_live_index: int
var volume_samples: Array = []

func _ready() -> void:
	record_live_index = AudioServer.get_bus_index('Record')

func _process(delta: float) -> void:
	var sample = db2linear(AudioServer.get_bus_peak_volume_left_db(record_live_index, 0))
	volume_samples.push_front(sample)

	if volume_samples.size() > MAX_SAMPLES:
		volume_samples.pop_back()

	var sample_avg = average_array(volume_samples)
	print('%sdb' % round(linear2db(sample_avg)))

func average_array(arr: Array) -> float:
	var avg = 0.0
	for i in range(arr.size()):
		avg += arr[i]
	avg /= arr.size()
	return avg
Getting the realtime frequency
The next step after getting the realtime volume of the mic input is to get the realtime frequency. Full disclaimer on this one - signal processing is a complex area of study and not something I know enough about to discuss in-depth. Therefore, what I’m going to show here is just the bare minimum using some built-in functionality from Godot, as described in this Godot devblog.
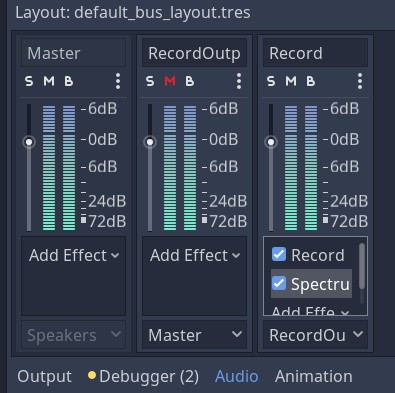
In short, once you have realtime audio monitoring set up, you can also add a Spectrum Analyzer effect to your “Record” bus, get a reference to this effect in your code (using AudioServer.get_bus_effect_instance again, but adjusting the index of the effect to whatever position the analyzer is on your bus), and call spectrum_analyzer.get_magnitude_for_frequency_range along with the minimum and maximum frequencies you want data for.
This function returns a vector, though, so just call magnitude.length() to get a singular value for the strength if needed. The returned value also tends to come out pretty weak, which makes sense since it’s just part of a signal that, as previously discussed, may need amplification anyways, so I noticed that the code for the sample project from Juan boosts the signal and renormalizes it with the line var energy = clamp((MIN_DB + linear2db(f.length()))/MIN_DB,0,1), so you’ll probably want to do that as well. Once you’ve got the signal how you like it, you’re ready to display or process it however you need to!
const MIN_DB: int = 80

var record_live_index: int
var spectrum_analyzer: AudioEffectSpectrumAnalyzerInstance

func _ready() -> void:
	record_live_index = AudioServer.get_bus_index('Record')
	spectrum_analyzer = AudioServer.get_bus_effect_instance(record_live_index, 1)

func _process() -> void:
    # Get the strength of the 0 - 200hz range of audio
    var magnitude = spectrum_analyzer.get_magnitude_for_frequency_range(
        0,
        200
	).length()

    # Boost the signal and normalize it
    var energy = clamp((MIN_DB + linear2db(magnitude))/MIN_DB, 0, 1)
	print(energy)
Changing the input device
The last thing you may be wondering is how to change what device is used for recording, and you’re in luck as the AudioServer offers all the functionality you need with simple, one-line functions. To get all available devices by name, you can call AudioServer.capture_get_device_list(). To get the current device being used, you can all AudioServer.capture_get_device(). And to set the device you want to record with, you can call AudioServer.capture_set_device() and pass it the name of the device you want to use.
Here’s how the sample project is set up for this:
extends OptionButton

var devices: Array

func _ready() -> void:
	devices = AudioServer.capture_get_device_list()
	for i in range(devices.size()):
		var device = devices[i]
		add_item(device)
		if device == AudioServer.capture_get_device():
			select(i)

func _on_device_selection_item_selected(index: int) -> void:
	AudioServer.capture_set_device(devices[index])
Closing thoughts
And that, finally, is everything you probably have wanted to know about using the microphone in Godot. In general, it’s really straightforward, it’s just not straightforward to find the information you need, so hopefully this helps you out a bit.