An introduction to state machines and the state pattern
The finite state machine is something that plenty of game developers have never heard of, but have almost certainly come very close to implementing a crude version of at some point or another. It’s a fundamental design pattern that’s fairly intuitive, with uses in character controllers, simple AI, and even UI components, but many, including myself, wouldn’t come up with the complete implementation of on their own without guidance from those smarter than us. It’s important to understand this design pattern because it offers a lot of bang for your buck, letting you write code that is cleaner, easier to maintain, and easily expandable for little effort.
So this week I’m going kick off a two part discussion on state machines and how to implement them. In this first post, I’ll talk about why you should care about state machines and introduce the state pattern, which will show us how we can implement a state machine in code. I’ll stick to pseudo-code this week so we don’t get too bogged down in engine-specific details, and next week we’ll step into Godot and look at how we can implement the state pattern there, taking advantage of the features that the engine offers.
So let’s dive in!
Life without the state machine
Let’s consider a simple platformer game. We start off with a clean project and throw in our idle animation as the default state for our player. We then add a run animation and some basic code based on what input the player is pressing.
class Player:
    func input(event):
        if MOVE_LEFT_PRESSED or MOVE_RIGHT_PRESSED:
            play_walking_animation()
            move()
        else:
            play_idle_animation()
So far, so good. But now we want to let the player jump, and if they can jump then they can also fall, so we go ahead and add animations and code for jumping and falling states.
class Player:
    func input(event):
        if JUMP_PRESSED and is_on_ground():
            play_jumping_animation()
            jump()
        else if !is_on_ground():
            play_falling_animation()
            fall()
        else if MOVE_LEFT_PRESSED or MOVE_RIGHT_PRESSED:
            play_walking_animation()
            move()
        else:
            play_idle_animation()
Except that the jump animation will only play for one frame before defaulting to the falling animation, and the player can no longer move when they’re in the air. So we need to add some more checks to this code. With a little bit of refactoring, we might end up with something like the following.
class Player:
    func input(event):
        if is_on_ground():
            if JUMP_PRESSED:
                jump()
                play_jumping_animation()
                if MOVE_LEFT_PRESSED or MOVE_RIGHT_PRESSED:
                    move_in_air()
            else if MOVE_LEFT_PRESSED or MOVE_RIGHT_PRESSED:
                move()
                play_walking_animation()
            else:
                play_idle_animation()
        else:
            # We assume y increases as we move down, as is convention in most game engines
            if velocity.y > 0:
                play_falling_animation()
            else:
                play_jumping_animation()
            if MOVE_LEFT_PRESSED or MOVE_RIGHT_PRESSED:
                move_in_air()
It’s serviceable, but what if we want to add in a double jump and maybe an attack? For the double jump, we’ll need a variable to track whether or not we’ve already double jumped (since at this point all we know is whether or not we’re in the air, not what we’ve done while in the air):
class Player:
    var has_double_jumped = false

    func input(event):
        if is_on_ground():
            has_double_jumped = false
            if JUMP_PRESSED:
                jump()
                play_jumping_animation()
                if MOVE_LEFT_PRESSED or MOVE_RIGHT_PRESSED:
                    move_in_air()
            else if MOVE_LEFT_PRESSED or MOVE_RIGHT_PRESSED:
                move()
                play_walking_animation()
            else:
                play_idle_animation()
        else:
            # We assume y increases as we move down, as is convention in most game engines
            if velocity.y > 0:
                play_falling_animation()
            else:
                play_jumping_animation()
            if MOVE_LEFT_PRESSED or MOVE_RIGHT_PRESSED:
                move_in_air()
            if JUMP_PRESSED and !has_double_jumped:
                has_double_jumped = true
                double_jump()
For the attack animation, we’ll need a timer or callback of some sort so we know when the attack is over and can transition back to our base states of idling, moving, jumping, or falling. We might also want to show a different animation when in the air versus on the ground. Pretty soon, we’ll end up with a long stretch of code filled with nested if statements and half a dozen variables that are used solely to track different states. It’s ugly, it’s error prone, it’s hard to debug, and if we decide later that we want to go full metroidvania and add a dozen more powerups and abilities, it’ll become a giant mess of hundreds of lines of code that we’ll never want to go near and probably never get completely bug free.
The finite state machine
So let’s take a step back, put down our keyboard, and step over to the whiteboard for a moment to figure out what it is we’re really trying to do. If I asked you to draw me a flowchart showing the rules of our character and when they should do what, you could do so pretty easily. Drawing our basic set of idle, walk, and jump states, we’d have the following (I’ve reworded a few of the checks for the sake of brevity).
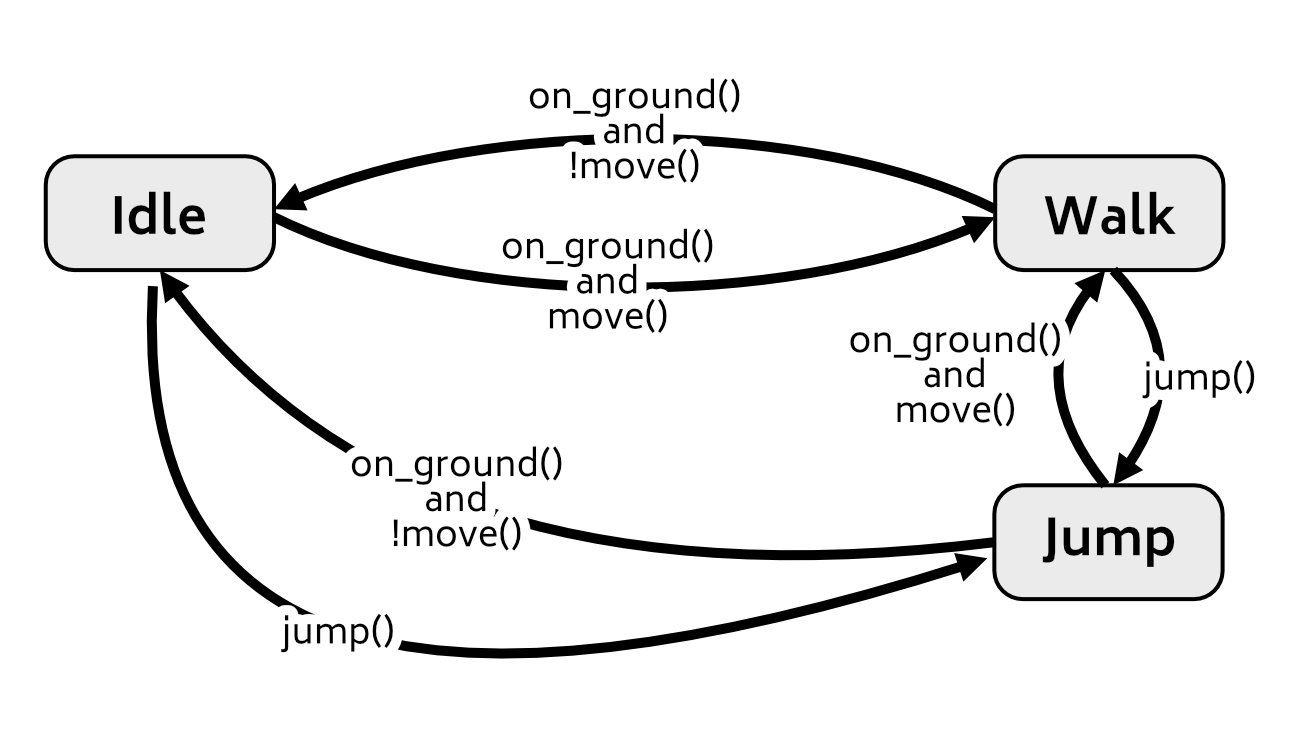
And we can further expand this out to include a fall state, double jump, or whatever other states we want. We know what the rules of our character are, and they’re not even THAT complicated (most of what we have so far is just dependent on whether we’re on the ground or not). What’s complicated is telling the computer the rules for switching between states when we have no concept of what we’re currently doing. As we saw above, a series of if statements just doesn’t cut it when we have more than two or three states we can be in. But, what we’ve just done with our flowcharts is describe a finite state machine, which can be summed up with a few rules:
- There is a fixed number of states our character can be in (idle, walking, jumping, etc)
- The player can only be in one state at a time (they can’t be walking and idling simultaneously)
- Each state is responsible for one doing one thing (the walking state walks and the jumping state jumps)
- The active state receives inputs (logical inputs, not necessarily key inputs from the player, though those are also valid inputs) and follows its own rules as to when to transition another state (if we’re falling and land on the ground, that’s one input into the machine, but then we can begin either walking or idling depending on what keys, if any, the player is pressing)
And that’s it as far as the concept is concerned. If you can draw the behavior you want with a flowchart, you can make a finite state machine out of it. But how do we turn our flowcharts into code? Let’s take a look.
Side Note: You’ll often see people (including myself) use the term finite state machine and state machine interchangeably. For most people’s purposes the two are the same thing (even Wikipedia redirects state machine to finite state machine), but a state machine is technically the more generalized form of the finite state machine, and it does not necessarily have a fixed, or finite (wink wink), number of states it can be in. But that’s as much as I can speak to the distinction since I am NOT an expert on AI and/or computational models. Get your local math or computer science professor drunk if you really want to dive into the differences between the two.
The basic implementation
If we have a fixed set of unique states and only one can be active at a time, we can get away with representing our current state using enums and branching our code as needed.
class Player:
    enum States {
        Idle,
        Walking,
        Falling,
        Jumping,
        # etc
    }

    var current_state = States.Idle

    func input(event):
        switch current_state:
            States.Idle:
                input_idling(event)
            States.Walking:
                input_walking(event)
            States.Falling:
                input_falling(event)
            # etc
While it still doesn’t completely get rid of the problems we ran into above (we still have to manage several variables and timers for different states), it does at least let us segregate our logic for each state into separate functions and give us a fairly readable stretch of code once more. With this setup, we can at least follow the branches of code easily enough that we can get where we need to for low mental effort if we need to debug something. This is the version of the state machine that I figure some of you have either implemented or come close to implementing in the past. Taking a glob of complex code and breaking it into smaller functions is a pretty natural step to take as your code base grows. The enum is just one more layer to help us keep track of everything.
You’ll quickly outgrow this implementation for many, or even most, use cases, but it is worth mentioning as it’s a great fit for very simple objects. In fact, I find myself reaching for this technique when I’m making an object with a basic on/off state, such as a door, or a simple turret that’s either scanning the room, firing on a target, or recharging its shot.
So if this method is ok, but not great, what’s a better way to implement a state machine?
The state pattern
The state pattern describes an object oriented way for an object to change its behavior on the fly based on the inputs it receives. The term “object oriented” is the give away for what we’re about to do:
- Create an interface representing a generic State
- Implement the interface with a class for each state
- Let the parent entity (our player) delegate all state-dependent logic to the class representing the active state
- Provide a way for states to transition to one another
Create an interface
First, we create an interface to describe a generic State that has a virtual method for everything we’d normally have a switch and/or if statement controlling. Implementing input and update methods is a good start, but you may also want to connect your physics update loop (if it’s separate from your regular update loop, like it is in Godot), collision callbacks, etc. Everything that would need to act differently based on the state we’re in gets a method that way we have a consistent interface our parent entity can reference.
interface State:
    input(event) -> void
    update(delta) -> void
Implement the interface
We then need to create a class for each state (idle, walking, jumping, falling, etc) that implements the state dependant logic. We’ll use our jump state as an example, excluding the code for transitioning to another state since we’ll come back to that in just a moment.
class JumpState implements State:
    func input(event) -> void:
        if DOUBLE_JUMP_PRESSED:
            // Transition to double jump state

    func update(delta) -> void:
        velocity.y += gravity * delta

        if velocity.y > 0:
            // Transition to fall state

        if is_on_ground():
            if MOVE_LEFT_PRESSED or MOVE_RIGHT_PRESSED:
                // Transition to walk state
            else:
                // Transition to idle state
Let the parent entity delegate
With each state now defined in its own class, the parent entity, our main Player class, just needs to track what the current state is and delegate all logic to it when an event occurs.
class Player:
    var active_state = new IdleState()

    func input(event) -> void:
        active_state.input(event)

    func update(delta) -> void:
        active_state.update(delta)
Changing states
So now we have the general idea of how everything works, but we’ve left out a pretty important detail: how the state change actually happens. There’s actually few different ways to implement this, but I’m going to show you my preferred method. Let’s go back to our interface and make a few changes:
interface State:
    input(event) -> State
    update(delta) -> State
In each virtual method, we’ll now let each state optionally instance a new state and return that to the player:
class JumpState implements State:
    func input(event) -> State:
        if DOUBLE_JUMP_PRESSED:
            return new DoubleJumpState()

    func update(delta) -> State:
        velocity.y += gravity * delta

        if velocity.y > 0:
            return new FallState()

        if is_on_ground():
            if MOVE_LEFT_PRESSED or MOVE_RIGHT_PRESSED:
                return new WalkState()
            else:
                return new IdleState()
And our player script becomes:
class Player:
    var active_state = new IdleState()

    func input(event) -> void:
        var new_state = active_state.input(event)
        if new_state:
            delete active_state
            active_state = new_state

    func update(delta) -> void:
        var new_state = active_state.update(delta)
        if new_state:
            delete active_state
            active_state = new_state
This method results in a fair bit of data churn, but it generally shouldn’t be a problem for performance. We won’t look at alternative implementations here, but if you do want to prevent this churn, you could also consider static states if there’s only one instance of an object in the world (such as the player in single player game) or consider keeping one instance of each class in memory and using a service to get a reference to each one at runtime.
Initialization and destruction
Let’s do one more refactor of our code and add logic that runs when we enter or exit a state. This is useful for things like switching animations upon entering a new state or cancelling any asynchronous calls that may be running when we exit a state.
interface State:
    enter() -> void
    exit() -> void
    input(event) -> State
    update(delta) -> State
Which turns our JumpState class into the following. Note that we still have to implement the exit() method even if we don’t need it for this particular class.
class JumpState implements State:
    func enter() -> void:
        play_jump_animation()
        play_jump_sound()

    func exit() -> void:
        pass

    func input(event) -> State:
        if DOUBLE_JUMP_PRESSED:
            return new DoubleJumpState()

    func update(delta) -> State:
        velocity.y += gravity * delta

        if velocity.y > 0:
            return new FallState()

        if is_on_ground():
            if MOVE_LEFT_PRESSED or MOVE_RIGHT_PRESSED:
                return new WalkState()
            else:
                return new IdleState()
And finally our Player class becomes:
class Player:
    var active_state = new IdleState()

    func change_state(new_state) -> void:
        active_state.exit()
        delete active_state
        active_state = new_state
        active_state.enter()

    func input(event) -> void:
        var new_state = active_state.input(event)
        if new_state:
            change_state(new_state)

    func update(delta) -> void:
        var new_state = active_state.update(delta)
        if new_state:
            change_state(new_state)
Finishing up
And now we have a robust state machine! Expanding on this (maybe we want to add a dash attack or a ground slide) just means writing a new class that implements our standard interface. No other parts of our code will care, and they just have to instance any new classes if and when they should switch to them. I’ll also mention that you may find yourself duplicating a lot of code or maybe doing the same thing each time you enter a state, just slightly differently, such as playing an animation and a sound upon entering every state. In such a case, you may find it useful to create a BaseState class that implements the state interface and let all of your other state classes inherit from that, just using a variable to modify reusable code blocks as needed.
class BaseState implements State:
    animation = null
    sfx = null

    func enter() -> void:
        # This assumes these methods know what to do if they receive null values
        play_animation(animation)
        play_sound(sfx)

    func exit() ->:
        pass

    func input(event) -> void:
        pass

    func update(delta) -> void:
        pass

class JumpState extends BaseState:
    animation = jump_animation_reference
    sfx = jump_sfx_reference

    func input(event) -> void:
        if DOUBLE_JUMP_PRESSED:
            return new DoubleJumpState()

    func update(delta) -> void:
        velocity.y += gravity * delta

        if velocity.y > 0:
            return new FallState()

        if is_on_ground():
            if MOVE_LEFT_PRESSED or MOVE_RIGHT_PRESSED:
                return new WalkState()
            else:
                return new IdleState()
Conclusion
And that’s all I want to talk about regarding state machines and the state pattern. There’s plenty more that I haven’t covered, but this should be enough to get you well on your way with them. If you want to know more, Game Programming Patterns has an excellent chapter on state machines along with some alternative implementations of them and additional ways they can be expanded. Next week I’ll show how we can implement a state machine in Godot.