Making a 3D tactics game in two weeks
I recently took part in Mech Jam III, where I created not only my first tactics game, but my first fully 3D game, Elemechs, and in this post I’m going to break down how I managed to pull this off, including details on art creation, design considerations, project structure, and system design since I figure the gamedev world could use more info on how these more systems-based games are made. Not saying I’ve done everything right (because I definitely haven’t), just sharing what did and didn’t work for me and what my takeaways are for future projects.
Quick game overview
So real quick, what is Elemechs? It’s a turn-based, tactical combat game where you control mechs that can control one of three elements: fire, water, and lightning. As you’d expect from a game involving the elements, there are also interactions between elements. Water puts out fire, but makes lightning stronger, for instance, and fire burns enemies over several turns, but can also be used to burn trees and carve new paths through levels. I wanted to go A LOT further with this concept of elemental interactions, including letting mechs merge together to create new “elements” (such as fire mech + water mech = steam mech) but as is always the case with game jams, I had to cut scope pretty aggressively and just settle on the foundational concept of elemental mechs, which are the main hook here, and as I mentioned before this was my first tactics game, so the rest of the game involves pretty standard tactics stuff: a square grid, one team goes and then the other, acting before moving ends your turn early, etc.
So with that out of the way, let’s talk about how this game was actually made.
Artwork
I may do a more in-depth look at this process in a future post, but since I wanted to do the artwork myself, and I can’t draw isometric very well, I decided to go 3D, but with some massive assists to make this feasible in the time available.
Modeling
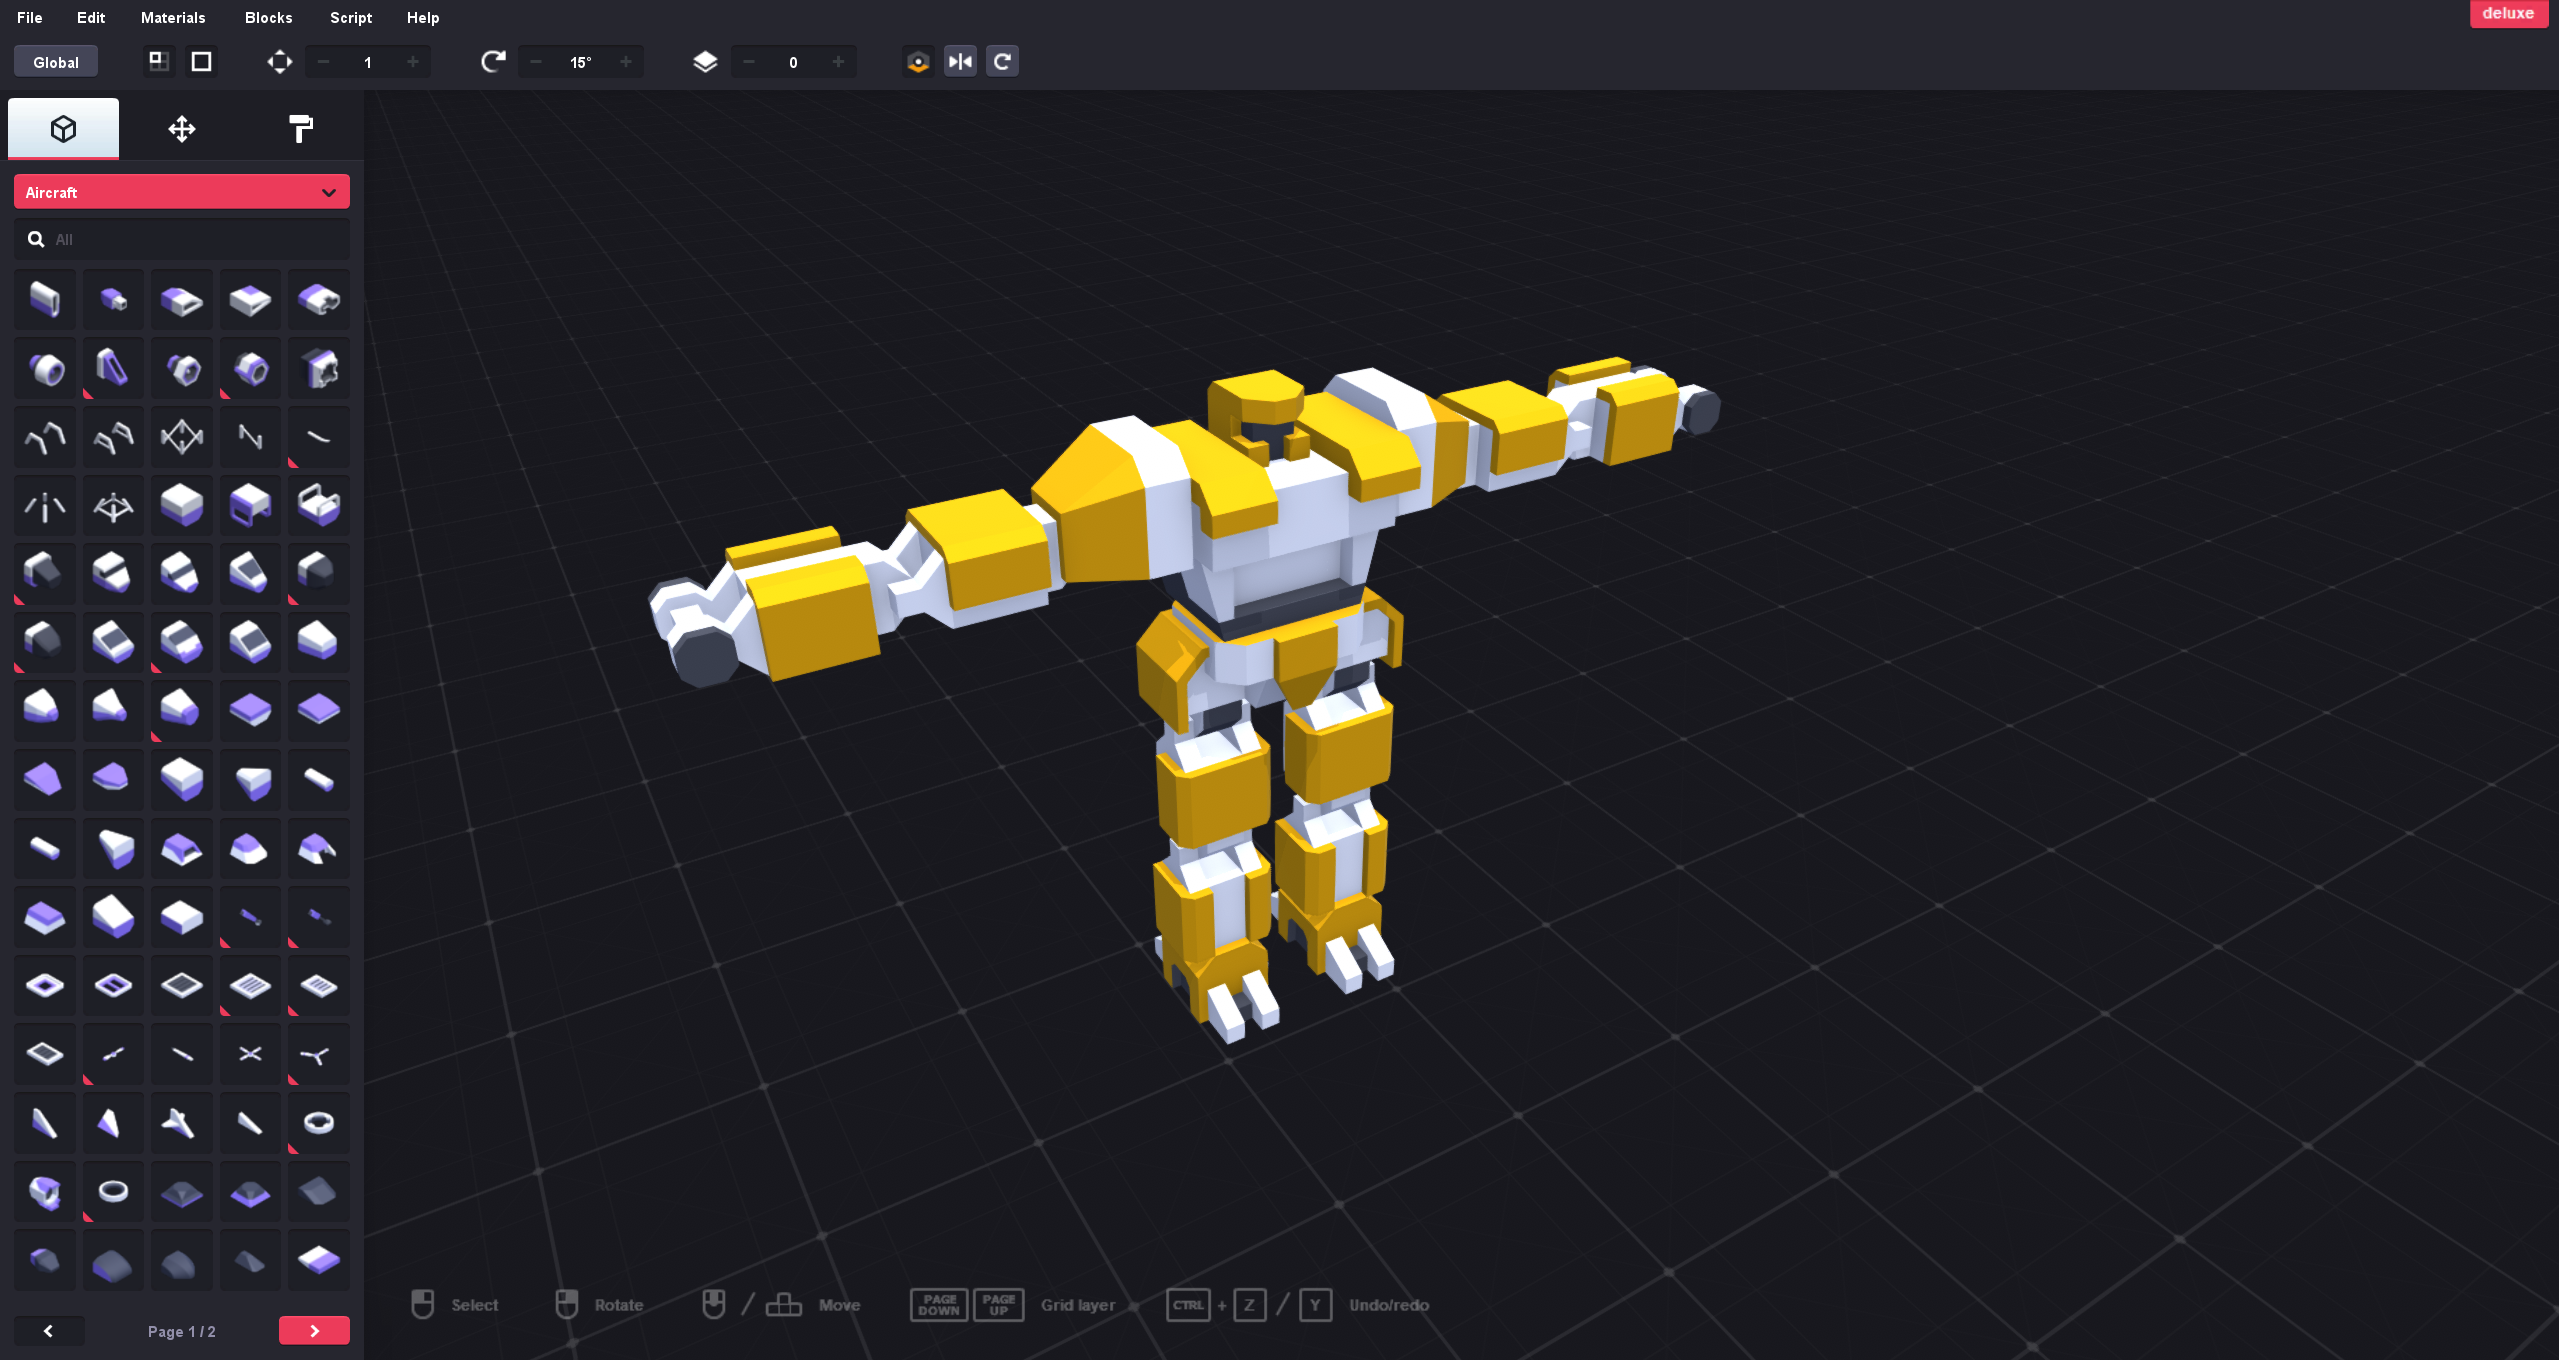
All assets in the game are made with Asset Forge, an offering by the one and only Kenney, where you take pre-designed “blocks” and piece them together to make new and interesting designs. You’re obviously limited to Kenney’s unique style of low-poly artwork, but if you’re ok with that (and I definitely am!), then this is an incredibly fast way to make 3D art. Furthermore, since I had to keep scope minimal, I decided to make one mech model and just recolor it for the different unit types. Simple and effective.
Rigging and animation
After modeling comes rigging and animation, which at first I thought I might try to do myself since I know just enough Blender to be dangerous, but after spending an hour or so with mediocre results, I decided to go with my planned alternative: Mixamo.
Mixamo isn’t exactly a secret in the gamedev world, but it is absolutely worth trying out if you have humanoid characters you want to rig and animate. You just take your model, drop a few points onto it so the app knows where different parts of the body are, and you end up with a fully rigged character ready to be animated, either by yourself or using the large library of animations Mixamo offers. Oh, and all of this is free!
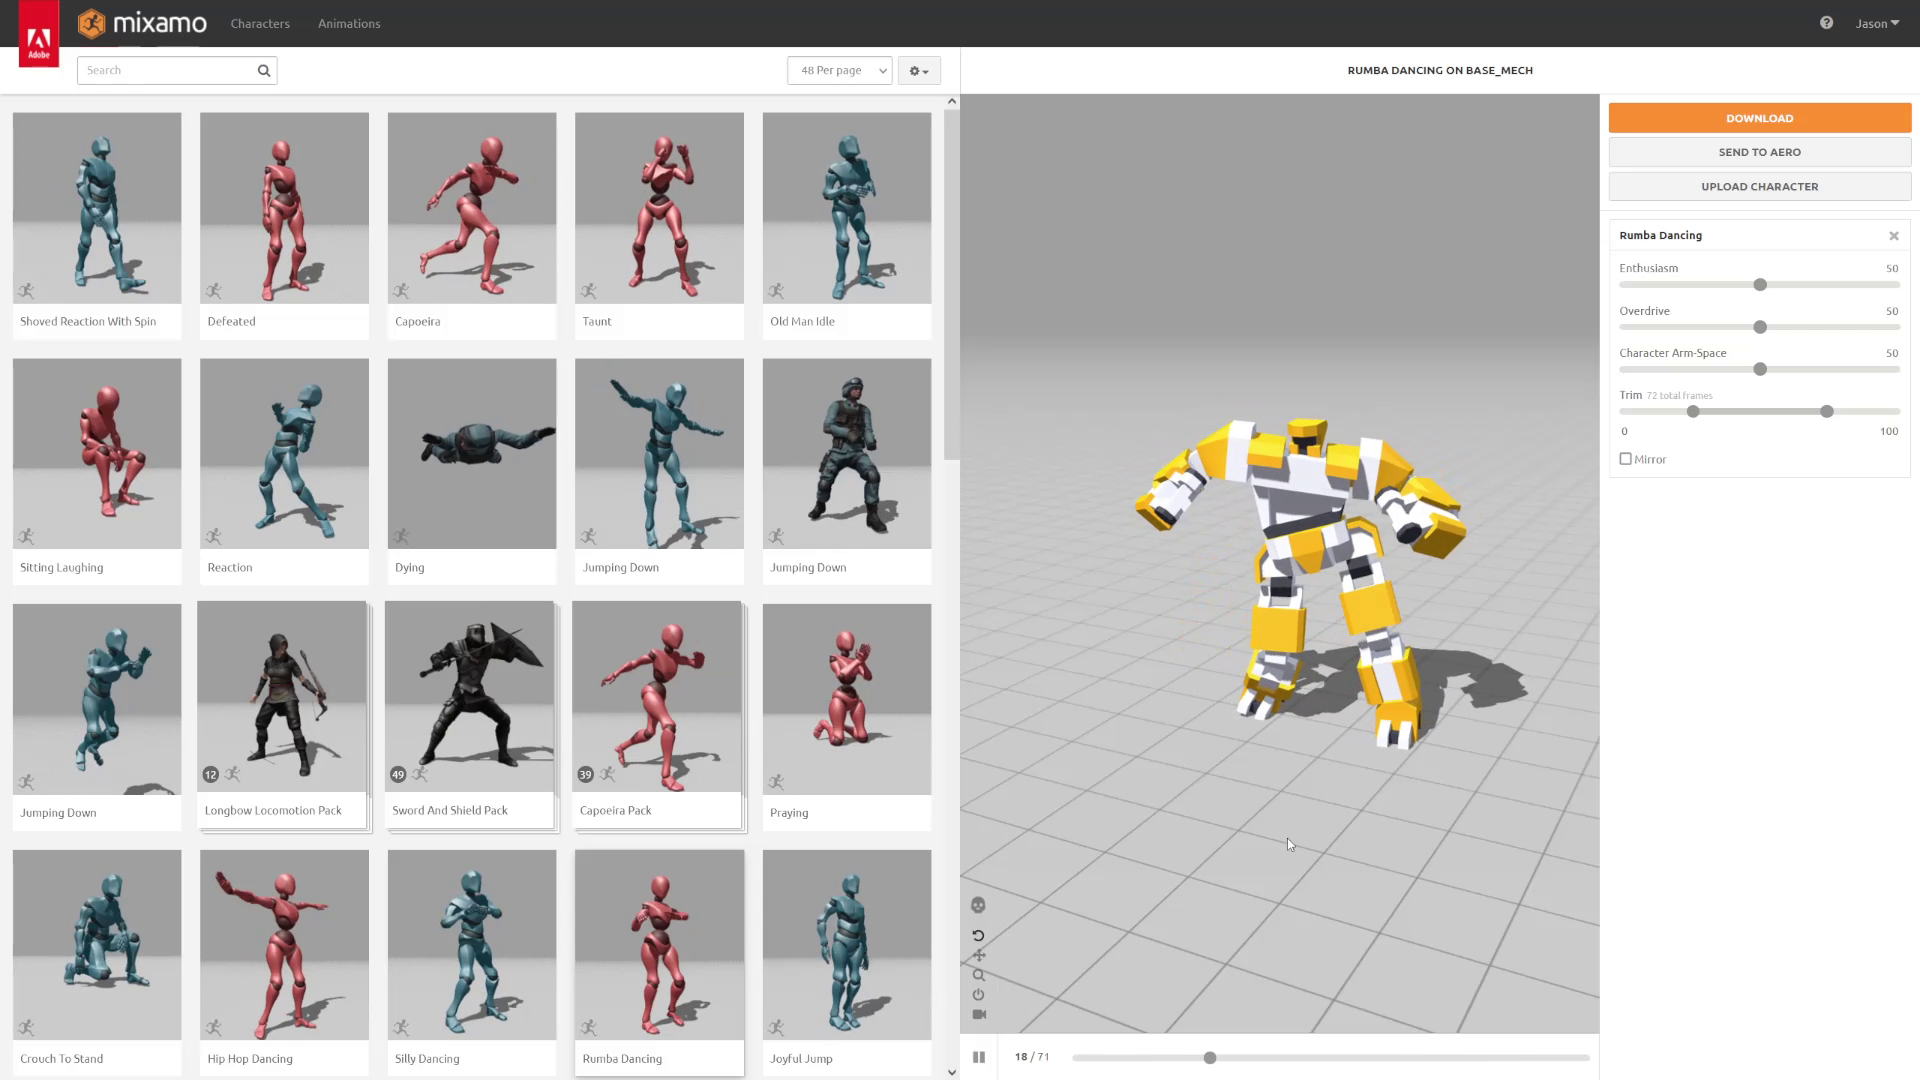
The main downside to Mixamo, other than you being stuck with their library of animations, is that it doesn’t let you download multiple animations in one file, meaning even on a small project like mine, I had to download 10+ files and then merge them myself. There’s a few different ways to do this, but I just did it all in Godot since you can copy and paste the animations from one file to another. Speaking of Godot…
Godot
As mentioned above, this is my first proper 3D game in Godot. I’m not completely new to it, as I have done some 3D prototypes in the past, but there was still a lot to figure out. As many are aware, the default 3D environment in Godot is pretty meh, so I went with the guidance from this YouTube video to help create a vibrant, colorful game and then adjusted from there. I still had to do some odd color and material tweaks to get the models looking how I wanted, but I’m going to chalk that up to my own inexperience. At least editing materials in Godot is easy enough.
Code structure and core systems
So now let’s look at how I structured the code of the application, because there is A LOT going on in even a basic tactics game like this, and while I think I got the general idea right, there’s definitely room for improvement here.
Mechs
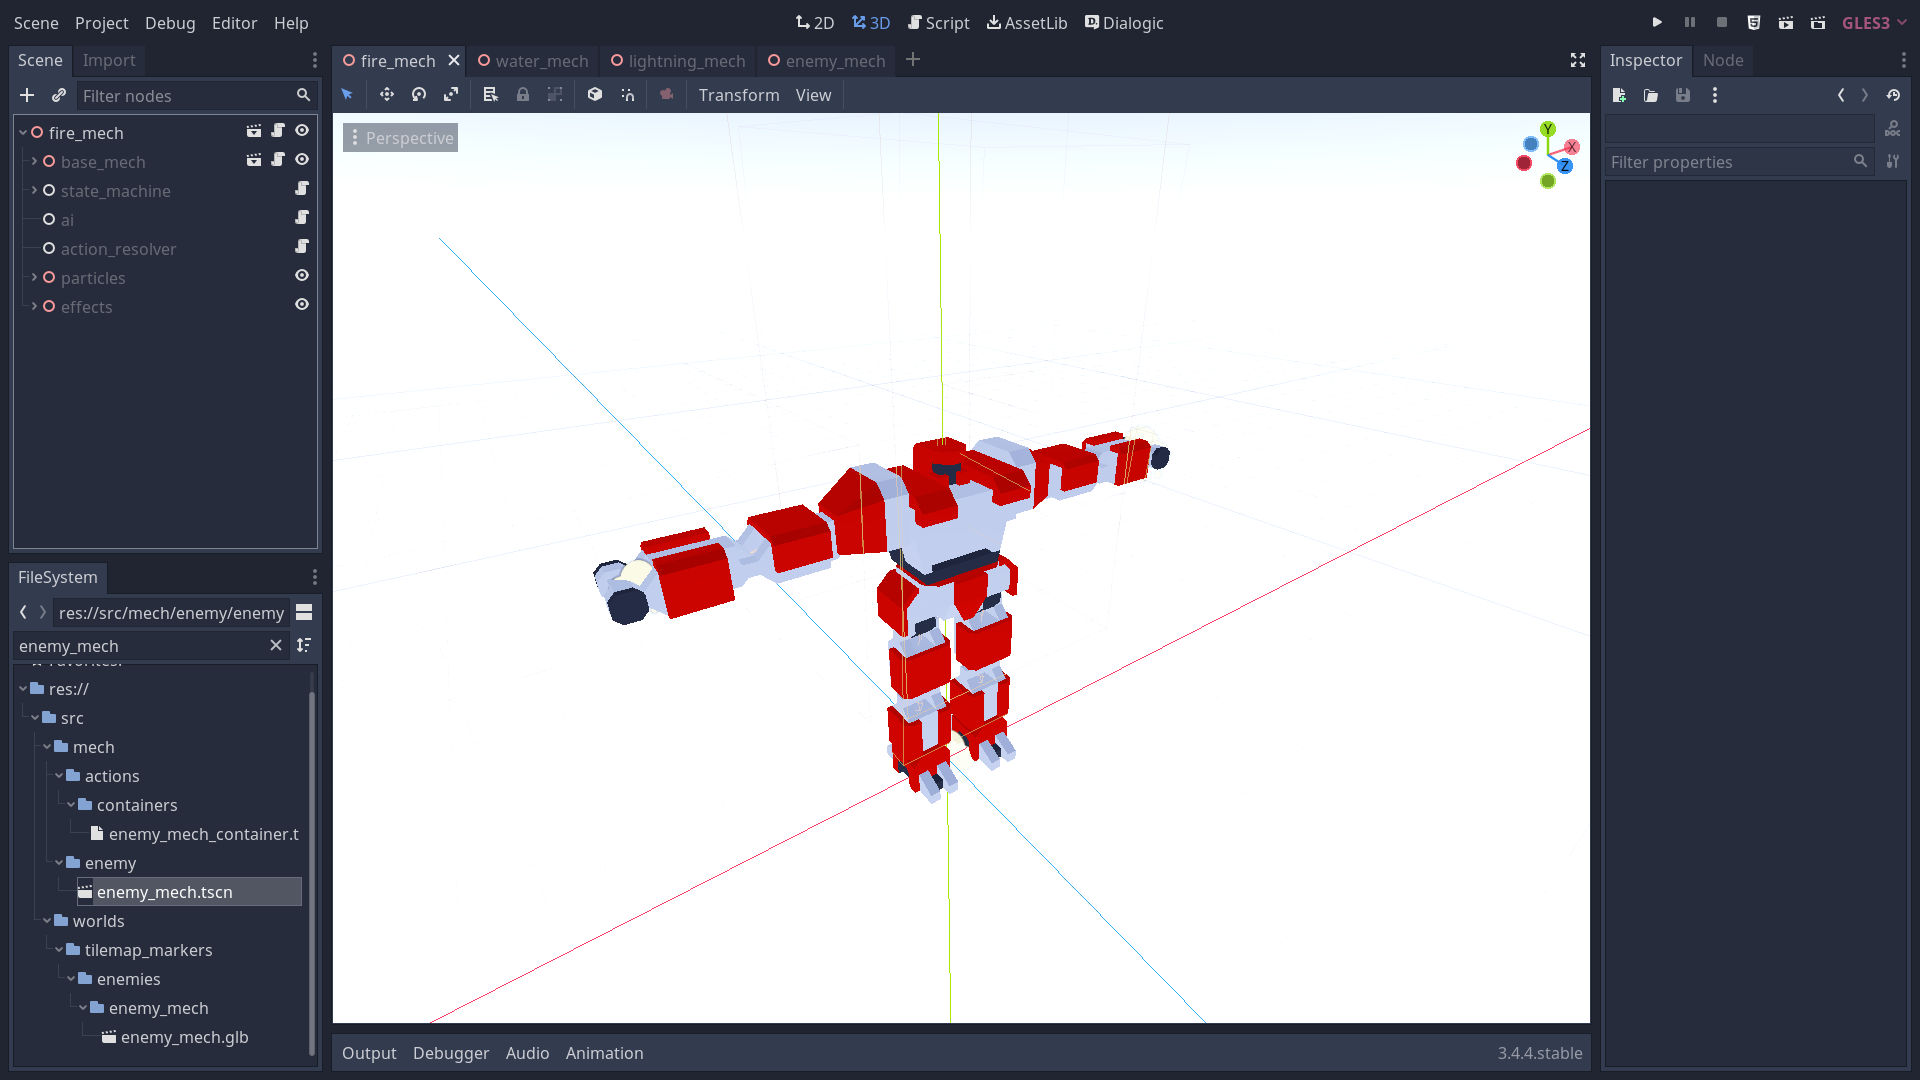
Let’s start with the mechs, which all share the same base entity and then apply their own customizations on top of it. Each mech consists of the model, animations (all stored in an Animation Player node), some particle effects, and a state machine, which usually just watches for an animation to finish and tells the parent entity we’re done doing something, though the movement state also determines the route to the target destination and moves along that route at the desired speed.
All of the mid-state triggers, such as when to play a sound effect or dealing damage when an attack lands, are fired in the animation for that state, which had the cool side effect of letting me put an Animation Speed setting in the game so that you can speed up the rate of gameplay. This setting basically just increases movement speed and changes the playback_speed property of the animations and everything else just works. Pretty cool!
The action list for each mech is a Resource that really just acts as a container of actions, and it probably could have just been kept as a simpler array since I don’t need persistance throughout the app and any additional uses I might’ve had in mind for it at some point never happened. So let’s just skip ahead to how actions work.
Actions
Actions also extend the Resource class and consist of a list of “effects” and some metadata about the action, such as its name in the UI and what method should be used for selecting a target (line of sight, select a single cell, etc).
Effects are where I actually define what an action does. Each effect defines a single aspect of an attack, such as a state change, a function call, or dealing damage to a target. With a collection of effects on an action, we can therefore have actions with unique abilities. A typical attack action, for instance, might consist of a Planning effect to let us know that the user or AI needs to first select a target, followed by a ChangeState effect to trigger the attack animation, which as mentioned previously will trigger the actual damage resolution once the animation is at the point where an attack would actually land on the target but uses the Damage effect to know how much damage to deal.
I will say that while I overall liked this system pretty well, I did find using Resources for every effect to be a pain since I had to duplicate each instance of the effect so that I could have Effect A do a different amount of damage than Effect B, so I don’t know if I’d go with this method again. I think I prefer what I’ve done on Kaiju Klash where I define some basic data container classes in code using the Reference class and then instantiate them at runtime to define what an attack does. It’s not as pretty or convenient as editing things in the editor, but it does mean I don’t have to remember to click “Make unique” in the editor when I’m editing a resource. Food for thought on tradeoffs at the very least…
Planning and executing actions
So now that we have our actions setup, how do they work in practice? First, we select our action to take, either from the UI for player-controlled mechs or as decided by the AI node on every mech (more on this node later). Once an action is selected, it goes to an Action Resolver node, which handles actually parsing out the effects of an action and figuring out how to execute it. The Repair action, for instance, plays the repair animation and heals the player, which is pretty simple to resolve. But most actions require an additional planning stage before execution. Where are you moving to? What target do you want to attack? Etc. If the mech is player controlled, we signal that we need to player to decide a target. If the mech is AI-controlled, we already know our target since that was taken into account during the decision making process. Either way, once the target has been selected, we let the resolver know to continue resolving the action and it goes through each effect, changing states, calling functions, etc until all effects have been resolved. Once this is complete, we signal that the mech has completed its turn and that the game should go on to the next mech.
Balancing mechs and attacks
With the systems and overall design of actions out of the way, we can now take a game design break to talk about the attacks themselves and how everything is balanced to provide an interesting challenge to the player. Initially, each mech was going to have the move and repair actions along with two element-specific attacks. After a few days of development, though, it became clear that doing two unique attacks per mech would take too much time to implement and balance, and that my time could be better spent elsewhere. So every mech in the game shares the repair, move, and punch actions and then has a unique ranged attack. The punch attack is strong, but requires the attacking mech to be adjacent to the target. The unique attacks are:
- Enemy mechs have a pistol attack that is weak but has a long range
- Fire mechs have a short range flamethrower attack that deals medium damage, but also deals burn damage to mechs over time and can be used to remove foliage
- Water mechs have a weak, medium range hydro jet attack that boosts lightning damage
- Lightning mechs have a long range, medium strength attack that becomes extremely powerful when combined with water
With everything listed out like that, and keeping in mind that all mechs have identical stats, it becomes pretty clear how the attacks are balanced. Generally speaking, attacks get weaker the larger their range is, with the exception of lightning attacks which always do at least a moderate amount of damage. The tradeoff on lightning attacks, though, is that since they are most powerful when combined with water attacks, and since the water attack on its own is quite weak, there’s a strong opportunity cost to not using a lightning attack on a mech that is wet.
I’m not going to claim that the attacks are perfectly balanced, or that no attack in the game couldn’t do more or less damage and be better balanced, but the general concept of trading range for strength, with the exception of the attacks that are dependent on one another for max damage, is pretty sound.
Taking turns
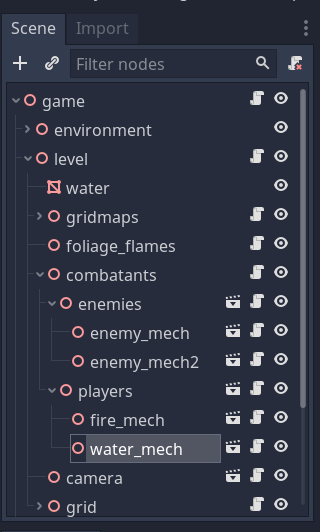
So now let’s step up a bit higher in the application hierarchy and talk about turn order and execution. Combat is managed at three different levels: a combatant manager (for lack of a better word here, I just refer to it as “Combatants” in my code), two combatant groups for the enemy and player mechs, and then the mechs themselves inside of whichever group they belong to.
Combatant manager
The combatant manager is focused on high-level management of the mechs. For instance, when a level starts, the combatant manager loads in the data from the level editor (more on that in a bit) and spawns mechs into the correct combatant group and location. It also does a bit of dependency injection so it can be signalled for various events by combatant groups, such as when a turn has been completed or if all mechs in that group are dead, and to add a few helper functions to combatant groups. After that, it largely just waits to be notified of when a turn has ended and signals to the opposite combatant group that it may begin taking its turn.
Combatant groups
Combatant groups manage the individual mechs belonging to either the enemy or player team. These groups do things like cycle through the available mechs to make sure everyone has taken an action before marking the group’s turn as complete, letting the individual mechs know when it’s their turn to take an action, and monitor overall team health so we can let the combatant manger know when a level has been won or lost. The combatant groups don’t handle a lot of code, but what they do is pretty integral to the operation of the game.
Making levels
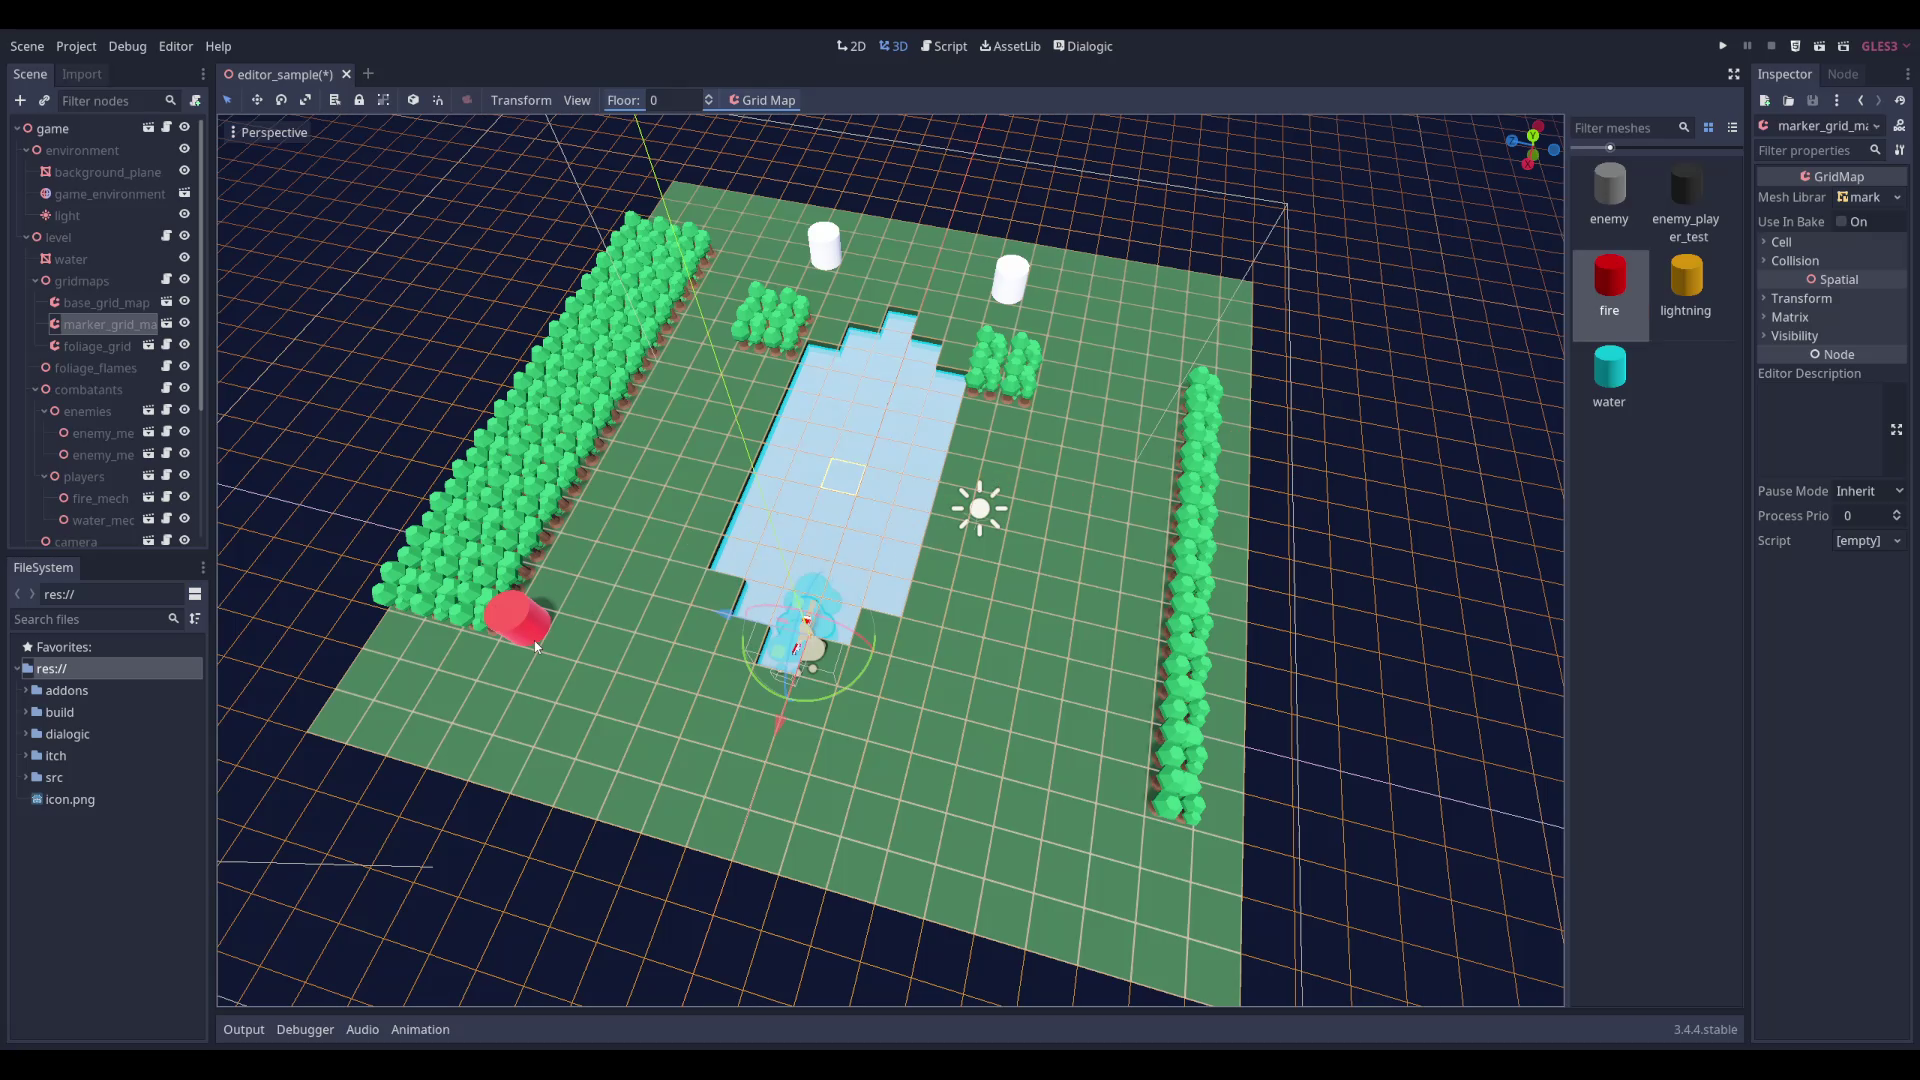
I mentioned above that I load in mech data from a level editor, so you may be wondering what this editor looks like. In short, it’s really just a few GridMaps that I edit in the editor: one for the basic ground and water tiles (though the actual water effect is a simple partially transparent plane), one for the mechs, and one for the foliage. In retrospect, though, I should have just done level design as a simple 2D tilemap and then rendered that data into GridMaps as it would’ve been simpler and faster to work with. Plus, Godot doesn’t seem to like having editing GridMaps in a scene as I’d occasionally get an error in the editor about certain signals already existing and therefore unable to be reconnected. This was usually followed by general weirdness with the GridMaps like a tile from the ground GridMap appearing in the foliage GridMap and requiring an editor restart to fix.
Despite being an imperfect solution, it did generally work quite well, though, and I was able to put more levels in the game than I’d expected I’d be able to.
The grid and pathfinding
Since levels are composed of GridMaps, that also made it easy to load data into Godot’s built-in AStar2D library to build out pathfinding. Why use AStar2D instead of the 3D variant since this is a 3D game? Simply put, there’s no verticality in this game so there’s no need to have the vertical axis as part of the pathfinding process. This is especially useful since not everything is on the same plane anyways. Foliage, for instance, sits on top of the ground, but should still act as an obstacle for pathfinding purposes. Dropping the Y-axis from pathfinding makes this automatically get taken into account.
Designing levels
So how were the levels actually designed? This being my first tactics game, I can’t say that it’s something I’m well attuned to, and there’s definitely a lot of room for improvement with this game. So to figure this out in a time-effective manner, I relied on the core concept behind a lot of great game design decisions: giving the player meaningful choices.
Tactics games are natural fits for providing the player with options and letting them decide what path to take, especially when you throw in a thinking and reactionary opponent who is working towards an opposing goal. So in Elemechs, a lot of the time it comes down to which targets do you attack first, which ones do you try to avoid, and how flexible is your strategy. Do you try and funnel enemies through a choke point but risk being slowly beaten down by ranged attacks or do you split the team and try to survive one-on-one encounters? Do you always keep water and lightning mechs together to do maximum damage, or do you go for less optimal damage output to help keep the fire mech alive?
I think “Surrounded”, which is coincidentally also the hardest level in the game, is the level that best shows what I was going for with my level design. In this level, you start out with a fire, water, and lightning mech in the middle of the map. Two enemy mechs are nearby, but don’t have a direct path to the player, and two enemy mechs are further off, but their path forward is more clear. Do you go ahead and attack the mechs that are nearby? If so, the fire mech risks opening up a more direct path for an enemy to take. Do you move to one side of the map and engage in combat earlier or stay in the middle? Staying in the middle buys you the most time, but leaves you exposed to ranged attacks for several turns and will eventually lead to all four mechs surrounding you and doing some serious damage.
It’s choices like these that I wanted to offer. Some levels, like “Surrounded” offer this, while others are a bit too simple or just time consuming to effectively communicate this. The difficulty in designing good levels is also impacted by the fact that there’s only one type of enemy mech in the game and it always has the same stats. Having weaker and stronger enemies to choose from would have given me a lot more freedom in how I design my levels, since as-is I can’t vary the number of mechs that the player faces at any one time too much without making the levels too easy or too hard, and since you can always take time to heal, it means that levels with multiple isolated encounters really just become slog fests, as the last level in the game unfortunately demonstrates.
AI
The AI in Elemechs is pretty simple, but fairly effective for what it is. The only major flaw with it is that there’s no coordination among enemy mechs, which is the main thing I think would help improve it and make it more interesting. Without coordination, though, I was able to get by with just an AI node on each mech that can be used by the mechs that need it and ignored by the player’s mechs. Having an AI node on every mech could also be used to provide suggestions to a player about potentially effective moves. Though that was obviously completely out of scope for the jam, I think that could be a nice option to have in a larger-scale project.
As for the actual decision making, it really just comes down to this:
- If an enemy is next to a player mech, attack them
- Otherwise, move towards a tile adjacent to the closest player mech
- Perform a melee or ranged attack if within range for either, with a preference given to melee attacks since they’re stronger
- Repair if there’s no other viable action to take
Not much to it, but it works pretty effectively as this game is neither a cakewalk nor brutally unfair. With coordination among mechs, it’d be great to have some enemies focus on ranged attacks, others focus on melee, and some focus on flanking the player or otherwise trying to get them to move in a certain direction.
Music and sound
So now let’s talk audio, starting with the soundtrack.
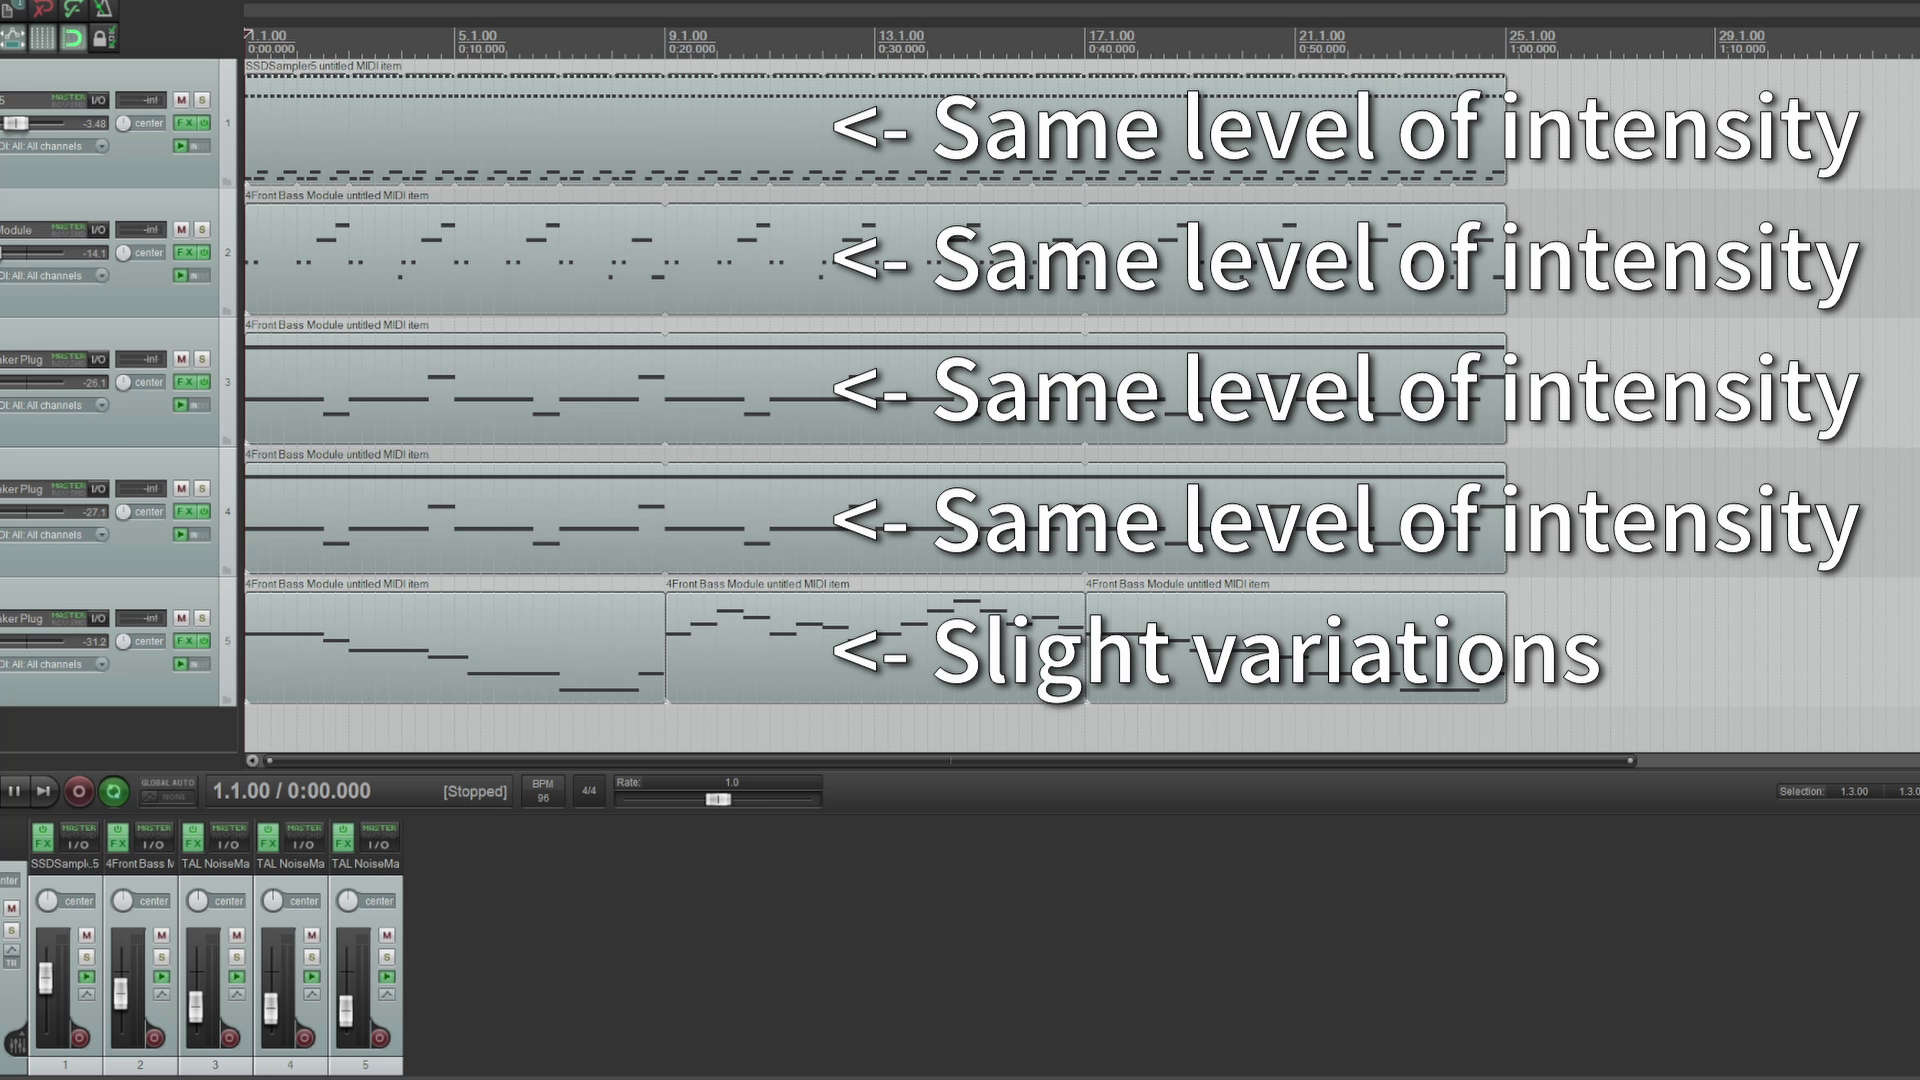
The song for this jam is pretty simple, with bass and drums driving the song and a few synthesizers layered on top to fill everything out. As I usually do for game jams, I focused on making a short loop that wouldn’t just completely drive the player crazy to hear repeating over and over. I like to accomplish this by not having any drastic changes in the melody or composition and also not having any sort of lead instrument mixed too strongly, or sometimes excluding lead instrumentation altogether. That funky interlude or crunchy guitar solo sounds cool the first time or two through, but ends up making it really obvious when the music is looping and eventually just becomes grating on the ears. So the soundtrack to Elemechs stays at a constant level of energy and no instruments ever come in or out of the mix. Not the most exciting way to compose, but at least you kind of just start to ignore the music after a while as opposed to wincing every time the loop starts over.
For sound effects, I had a hard time finding anything online I liked so I decided to just make it all myself. There’s a bit of processing on each sound effect to do things like add some saturation / positive harmonics and EQ adjustments, but otherwise:
- The flamethrower effect is me blowing into a microphone
- The water effect is just a running faucet
- The gunshot is a snare drum, which ended up not mixing very well on top of the music, so that was a bit of a misstep
- The punching sound effect is an electronic snare and clap combined together
- The lightning attack is crinkling aluminum foil followed by the sound of me hitting the garage door with my fist
- Synthesizers create the repair and dying sound effects
- And hitting the ground, either upon death or when moving, is me hitting my office chair with my fist with a little bit of a kick drum underneath to make it deeper more rumbly
I’m not going to say that these are the greatest sound effects in the world, but I think they’re fairly solid considering their humble sources, so I’d highly encourage the reader to try and make their own sound effects sometime and see what they can get out of it. And if you’re not sure how to make something, give it a Google! There are entire websites and forums dedicated to the art of foley. You’re sure to find some options that are feasible for you!
Conclusion
And that’s a pretty in-depth look at how I made Elemechs in two weeks. Overall, I’m pretty happy with how the game turned out, and it’s definitely a pretty big milestone for me to tackle 3D and tactics in only two-weeks time. There’s a lot of room for improvement with this game, but I feel like I definitely have a clearer idea of what this process would need to look like for a future project now that I’ve gone ahead and done it once, and hopefully you have a clearer idea of how to make a game like this yourself. Feel free to reach out if you have any questions about how or why I did something.